發表文章

目前顯示的是有「艾鍗學院」標籤的文章

小小的 copy 大大的學問

平常都是直接在電腦上寫程式,結果面試的時候要在紙上寫,還真的寫不太出來。因為都習慣線上查資料,所以參數都沒有背,所以拿回家 compiler 後果然一堆錯誤,不是參數位置放錯,不然就是個數不正確。 以下是修改過的版本,錯誤檢查是一定要的,比較特別的是 fread  跟 fwrite  的第 2 & 3 個參數,其中第 2 個參數是 size,第 3 個參數是個數,而傳回值是成功讀取或寫入的個數而非 size。我原本的寫法是 length = fread(buf, sizeof(buf),1 , fp) 成功時 length = 1,但最後一筆不滿 buf size 的就讀不到了,所以才改成 length = fread(buf, 1, sizeof(buf) , fp) 這樣 length 就傳回實際讀到的長度了,不過不曉得有沒有影響效能就是了

重建 BeagleBoard-xM Angstrom

圖片
自從開始玩 BeagleBoard-xM  後,SD 卡不曉得被我毀掉幾次了 (原廠建議這一塊不要動,另外拿一塊新的 SD 卡來實驗,不過我沒有多的,只好 ...)。有幾次雖然有載入 Angstrom,HDMI 也有畫面輸出,LED 也是一直閃,但卡在登入畫面一個多小時 (Console 顯示 Uncompressing Linux...),實在是沒耐性就把它給關了。

Read Beagle Board xM RS-232 Serial output

環境設置 Beagle Board xM 使用 OTG USB 供電 Beagle Board xM RS-232 Serial output 連接到電腦 USB to COM 軟體修改老師的 ext_uart.c 如下

getfile

圖片
實現 getfile <ipaddr> <source filename> <destination filename> 例如 ./getfile 127.0.0.1 /etc/passwd passwd 顯示 成功 GET Success (12345 bytes) 失敗 Error! 參考 ch7/file ch7/wrapper/tcputils.c

Character bitmap with signal

圖片
#include <stdio.h> #include <signal.h> #include <unistd.h> //how_bitmap函式可將二維陣列的值輸出,輸出方式:當bit為1時輸出’*’,0輸出空白 //字元’ ’,每處理完2個byte輸出換行'\n' void update_time(int sig); char array[2][30] = { { 0x08,0x20,0x08,0x24,0xfe,0xfe,0x08,0x20, 0x00,0x00,0x08,0x20,0x04,0x40,0x04,0x40, 0x02,0x80,0x01,0x00,0x02,0x80,0x0c,0x70, 0x30,0x0e,0xc0,0x04,0x00,0x00 }, { 0x20,0x20,0x51,0xfc,0x88,0x88,0x00,0x50, 0xfb,0xfe,0x22,0x22,0x22,0x22,0xf9,0xfc, 0x21,0x24,0x21,0x24,0xa9,0x24,0x71,0x2c, 0x20,0x20,0xf8,0x20,0x00,0x00 } }; void update_time(int sig) { static int i = 0; static char *ptr = (char*)(void*)array; // change to one dimention char array int j,k; if (i < sizeof(array)) { for (j=0; j<2; j++) { for (k=7; k>=0; k--) { printf("%c", ( *(ptr+i) & (1 << k) ) ? '*' : ' '); ...

Character bitmap

圖片
#include <stdio.h> //how_bitmap函式可將二維陣列的值輸出,輸出方式:當bit為1時輸出’*’,0輸出空白 //字元’ ’,每處理完2個byte輸出換行'\n' void show_bitmap( char (*a)[30] ,int row); char array[2][30] = { { 0x08,0x20,0x08,0x24,0xfe,0xfe,0x08,0x20, 0x00,0x00,0x08,0x20,0x04,0x40,0x04,0x40, 0x02,0x80,0x01,0x00,0x02,0x80,0x0c,0x70, 0x30,0x0e,0xc0,0x04,0x00,0x00 }, { 0x20,0x20,0x51,0xfc,0x88,0x88,0x00,0x50, 0xfb,0xfe,0x22,0x22,0x22,0x22,0xf9,0xfc, 0x21,0x24,0x21,0x24,0xa9,0x24,0x71,0x2c, 0x20,0x20,0xf8,0x20,0x00,0x00 } }; void show_bitmap( char (*a)[30] ,int row) { int i, j, k; for (i=0; i<row; i++) { for (j=0; j<30; j++) { for (k=7; k>=0; k--) { printf("%c", ( a[i][j] & (1 << k) ) ? '*' : ' '); } if ( (j % 2) == 1 ) // new line every two bytes { printf("\n"); ...

qsort without move

圖片
使用 qsort 排序字串陣列,輸出按字典排序方式輸出,但排列完成後,原始陣列內容不可改變 #include <stdio.h> #include <stdlib.h> #include <unistd.h> #include <string.h> #define length (sizeof(string) / sizeof(string[0])) char string[][12] = { "Linux", "programming", "Embedded", "Android", "ittraining" }; static int cmpstringp(const void *p1, const void *p2) { return strcmp(*(char * const *)p1, *(char * const *)p2); } int main() { char* stringindex[length]; int i; // copy pointer for (i=0; i<length; i++) { stringindex[i] = string[i]; } qsort(stringindex, length, sizeof(stringindex[0]), cmpstringp); printf("\nSorted data:\n"); for (i=0; i<length; i++) { printf("%d = %s\n", i, stringindex[i]); } printf("After qsort, origonal array:\n"); for (i=0; i<length; i++) { printf("string[%d] = %s\n", i, string[i]); } ...

Padding file

對任意讀入的檔案進行 padding Padding rule:以 1M, 2M, 4M ... 二的倍數去 padding  顯示補了多少 Bytes 的資料 操作方式:./padding <file> #include <stdio.h> #include <stdlib.h> #include <sys/types.h> #include <sys/stat.h> #include <unistd.h> #include <fcntl.h> #include <string.h> #include <errno.h> int main(int argc, char *argv[]) { int fd; struct stat filestat; off_t alignmentsize; if (argc != 2) { printf("padding <filename>\n"); return 0; } // open file fd = open(argv[1], O_RDWR | O_EXCL); if (fd < 0) { printf("%s\n", strerror(errno)); return 0; } // get filesize fstat(fd, &filestat); if (filestat.st_size >= (1ul << 31) ) { close(fd); perror("File great than 2GB, it can not padding."); return 0; } // check alignment size alignmentsize = 1; while (filestat.st...

PIC 中斷程式寫法

圖片
程式碼的框架如下 #include < myapp.h > void HISR(); // 高優先權中斷服務常式宣告 void LISR(); // 低優先權中斷服務常式宣告 #pragma config PBADEN = OFF // 將 Port B 類比輸入的功能關閉 // 設定為數位輸入 #pragma code P008 = 0x000008 // 將高優先權中斷服務常式的位置固定在 0x0008 void P008(void) { _asm goto HISR _endasm; // 因空間有限,故跳到實際的中斷服務常式 } #pragma code P018 = 0x000018 // 將低優先權中斷服務常式的位置固定在 0x0018 void P018(void) { _asm goto LISR _endasm; // 跳到實際的中斷服務常式 } #pragma code // 固定程式碼結束標記 #pragma interrupt HISR // 宣告此函式為中斷服務常式,會自動保存暫存器 void HISR() // 並以中斷的方式返回 (重啟 GIE) { CLR(INTCON,BIT1); // 清除中斷旗標 } #pragma interruptlow LISR void LISR() { CLR(INTCON,BIT1); } void main() { SET(INTCON, BIT7 | BIT6 | BIT4); // 初始化 INT0 中斷 while (1) { } }

PIC 中斷觀察

圖片
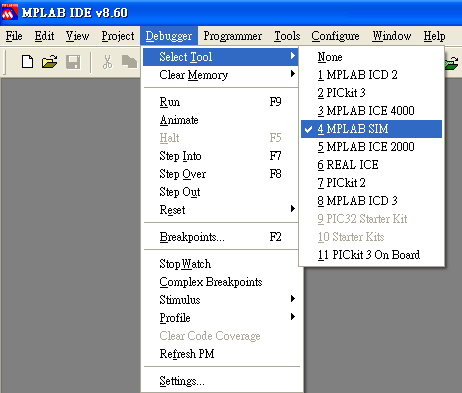
今天來觀察一下中斷的工作方式,先到 Debugger | Select Tool | MPLAB SIM 選擇軟體模擬的方式,然後開啟 View | Program Memory ,照以下的說明輸入組合語言程式來觀察一下吧

PIC18x Timer 分享 IV

圖片
這一次我們就來看看 CCP1 的輸出功能

PIC18x Timer 分享 III

圖片
經過 Timer0 的洗禮,會不會覺得 8-bit 的計數太 Low end 呢?還得自己數 125 次才能得到 1ms。接下來讓我們看看 Timer1 + CCP 模組的威力吧! PIC18F4520 Data Sheet (Page 130)

PIC18x Timer 分享 II

圖片
在繼續之前,我們先來看看上次的討論

PIC18x Timer 分享 I

圖片
今天課程的重點是 PIC Timer 的介紹,首先我們來觀察一下 Timer 是怎麼一回事呢?

myapp.h

圖片
#ifndef __MYAPP__ #define __MYAPP__ #include <p18f4520.h> #define BIT0 (1) #define BIT1 (1 << 1) #define BIT2 (1 << 2) #define BIT3 (1 << 3) #define BIT4 (1 << 4) #define BIT5 (1 << 5) #define BIT6 (1 << 6) #define BIT7 (1 << 7) #define SET(reg,b) reg |= (b) #define CLR(reg,b) reg &= ~(b) #define TGL(reg,b) reg ^= (b) #define GET(reg,b) (reg & (b)) typedef enum { FALSE, TRUE } BOOL; // 2012/10/18 add typedef unsigned char uint8; typedef unsigned int uint16; typedef unsigned short long uint24; typedef unsigned long int uint32; typedef char int8; typedef int int16; typedef short long int24; typedef long int int32; #endif // __MYAPP__ 由於這是一個共用的標頭檔,建議把它放在專案一個固定的目錄下,例如 D:\PIC18\Include ,則 PIC18 底下的其它專案要引用只要設定 Include 路徑 就可以了,就樣就可以只維護一份最新的,而不用每個專案都要 Copy 一份了 開啟專案後,點選 Project | Build Options | Project ,選擇 Include Search Path ,新增一個 ..\include 即可。這裡用相對路徑而不用絕對路徑是方便將專案移到其它位置時不用再修改一次。